Get Complete Project Material File(s) Now! »
Chapter 3 Finite Element Analysis – Based MR Model
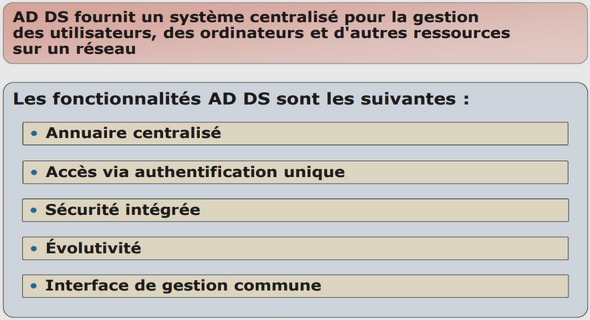
Introduction
An MR damper is to be analyzed as a 2-D axisymmetric model. For a given current, we can determine the magnetic flux density at the Engine, MR Fluid and the Damper Housing.
The dimensions of the MR Damper are in meters. The Damper piston (here, frequently referred to as “Engine”, MR fluid gap and the damper housing are the stationary component that completes the magnetic circuit around the coil. A wound coil of 650 windings, shown in Figure 3.2, provides the magnetic flux field that is necessary for energizing the MR fluid. The electrical current through the coil can be varied to change the magnetic flux density, therefore the extent to which the MR fluid is energized. The plastic liner gap is the thin rectangular region between the (Engine/MR Fluid gap) and the electrical coil.
To assist the reader in understanding the following discussion, Table 3.1, lists the magnetic terms that are used in this study.
Approach and Assumption
The flux leakage out of the engine and housing at the perimeter of the model is assumed to be negligible enough that no saturation of the material occurs. This allows a single iteration linear analysis. This assumption simplifies the analysis and allows the model to remain small. The model would normally be created with a layer of air surrounding the iron equal to or greater than the maximum radius of the iron to model the effects of flux leakage. The non magnetic gap is modeled so that a quadrilateral mesh is possible. A quadrilateral mesh allows for a uniform thickness of the air elements adjacent to the engine where the virtual work force calculation is performed.
For a static (DC) current, ANSYS requires the current to be input in the form of current density (current over the area of the coil).
ANSYS is used to compute the current density from the number of turns (N), the current (I), and the coil area (A). The assumption of no leakage at the perimeter of the model means that the flux will be acting parallel to this surface. This assumption is enforced by the « flux parallel » boundary condition placed around the model. This boundary condition is used for models in which the flux is contained in an iron circuit. In postprocessing, the forces are summarized for the engine, MR fluid and the engine housing, using a Maxwell stress tensor and a virtual work calculation. Flux density also is displayed. The final postprocessing operation computes the terminal parameters including coil inductance.
Element description
The ANSYS program includes a variety of elements that we can use to model electromagnetic phenomena. After some research, we determine that PLANE13 was the most suitable element for our model because it is a 2-D quadrilateral Coupled-Field-Solid, which contains four nodes, as shown in figure 3.3. PLANE13 has a 2-D magnetic, thermal, electrical and piezoelectric field capability with limited coupling between the fields. Four nodes with up to four degrees of freedom per node define PLANE13. The element has nonlinear magnetic capability for modeling B-H curves.
Input Data
The geometry, node locations, and the coordinate system for a Plane 13 element are shown in Figure 3.3. The element input includes four nodes and magnetic, electrical properties. The type of units used is metric and it is specified through the EMUNIT command. EMUNIT also determines the value of µ0 (free-space permeability) which is equal to 4π *10−7 henries/meter. In addition to µ0 , constant relative permeability for each material is specified through the µ x material property labels. The B-H curve will be used in each element coordinate direction where a zero value of relative permeability is specified. Only one B-H curve may be specified per material. Body loads – source current density – may be input as an element value or may be applied to an area.
Output Data
The solution output associated with the element is in two forms:
• Nodal degrees of freedom included in the overall nodal solution
• Additional element output like the electromagnetic components
The element output directions are parallel to the element coordinate system, as shown in Figure .
Because of different sign conventions for Cartesian and polar coordinate systems, magnetic flux density vectors point in opposite directions for planar and axisymmetric analyses. In ANSYS, we define the magnetic flux density as Bx and By along the x and y axis. The term Bsum is the vector magnitude of B, defined by BSum = B2 x + B2 y (3.2)
Along with the magnetic flux density, we have a list of names that define all the electromagnetic component of an element. We can name the magnetic permeability ( µ x – µ y ) and the magnetic field intensity components Hx and Hy.
Assumptions and Restrictions
In any 2-D axisymmetric model, we have to have some assumptions and restrictions which will allow us to create the model and be able to revolve it around the axis of symmetry. The assumptions made for this study are:
• The area of the element must be positive
• The element must lie in a global X-Y plane
• Y-axis must be the axis of symmetry for axisymmetric analysis
• An axisymmetric structure should be modeled in the +X quadrants
• The only active degrees of freedom are the magnetic vector potential (AZ) and the time integrated electric potential
• The element used in the model has only magnetic and electric field capability
• The element does not have structural, thermal, or piezoelectric capability
• The only allowable material properties are the magnetic and electric properties ( µ0 , µ x ), plus the B-H data table
• A Maxwell force flag is the only applicable surface loads and the element does not allow any special features.
Steps in a Static Magnetic Analysis
This section describes the procedure for a static magnetic analysis, consisting of the following five main steps:
1- Create the physics environment
2- Build and mesh the model and assign physics attributes to each region within the model
3- Apply boundary conditions and loads (excitation)
4- Obtain the solution
5- Review the results
Creating the Physics Environment
In defining the physics environment for an analysis, one needs to enter the ANSYS preprocessor and establish a mathematical simulation model of the physical problem. To do so, the following steps need to be taken:
1- Set Graphical User Interface (GUI) preferences
2- Define the analysis title
3- Define element types and options
4- Define a system of units
5- Define material properties
Setting GUI Preferences
Upon completing the GUI, we choose the menu path Main Menu>Preferences and select Magnetic-Nodal from the list of magnetic analysis types on the dialog box that appears. Setting the preferences is really important before doing anything to the model. We have to specify Magnetic-Nodal to ensure that we can use the elements needed for 2-D static analysis.
Defining an Analysis Title
We should give the analysis a title that reflects the problem being analyzed, such as “2-D MR Damper static analysis.” Save the model as database file only (. db). To assign a title we use the following:
Utility Menu>File> Save As
Specifying Element Types and Options
Element types establish the physics of the problem domain. We decided to use the PLANE13 element to represent all interior regions of the model magnetic regions and permanent regions. Most element types have additional options known as KEYOPTs, which we use to modify element characteristics. For example, element PLANE13 have the following KEYOPTs:
KEYOPT (1) selects the element’s DOFs
KEYOPT (2) specified whether the element uses extra shapes or not
KEYOPT (3) selects plane or axisymmetric option
KEYOPT (4) sets the type of element coordinate system
KEYOPT (5) specified whether the element uses extra element output
To specify KEYOPT settings, use the following:
Main Menu>Preprocessor>Element Type>Add/Edit/Delete
Choosing a System of Units in our Analysis
The default system of units is the metric system which can be changed to other unit systems using the following steps:
Main Menu>Preprocessor>Material Props>Electromag Units
Based on the input units we specify, the free-space permeability µ 0 is determined automatically as follows:
µ 0 = 4π *10−7 H/m in MKS units
3.4.1.5 Specifying Material Properties
The ANSYS material library contains definitions of several materials with magnetic properties. In our model, we simply define the constant relative permeability for each material. Working with MR fluids, we can define the properties by the B-H curves.
To define the constant relative permeability for a specific material, we use the following:
Main Menu>Preprocessor>Material Props>Material Models>Electromagnetics >Relative Permeability>Constant
In the case of the MR fluids, we specify the B-H curve by creating our own curve. We can specify the coordinate’s points of the MR fluid by choosing any point on the B-H curve, as shown in Figure 3.5.
To do so, we use the following:
Main Menu>Preprocessor>Material Props>Material Models> Electromagnetics>BH Curve
Building and Meshing the Model and Assigning Region Attributes
To build the model, we simply create five rectangles that will represent all different areas of the MR damper. We can build all the rectangles first, and then use the overlap command on all areas to make sure that we do not have any duplicated regions.
Then we assign attributes to each region in the model (Attributes are the element types and options, element coordinate systems, and material properties, as were defined earlier).
To assign attributes, we perform these tasks:
1- Choose Main Menu>-Attributes->Define>Picked Areas. The Meshing Attributes dialog box appears.
2- Pick the area(s) comprising one of the regions in my model.
3- On the dialog box, we specify the material number, element type and element coordinate system to use for the area or areas. Click OK.
4- Repeat the process for the next region, the region after that, and so on until all regions have defined attributes.
When we finish assigning all regional attributes, we mesh the model using the Meshing Attributes dialog box. We simply click on the Mesh button, and we pick all the areas defined. We can always refine our mesh in different areas of the model.
Applying Boundary Conditions and Loads
We can apply boundary conditions and loads to a 2-D static magnetic analysis either on the solid model or on the finite element model. The ANSYS program automatically transfers loads applied to the solid model to the mesh during solution.
We can access all loading operation through a series of cascading menus. When we choose Main Menu>Solution>-Loads->Apply>-Magnetic-, the ANSYS program lists available boundary conditions and three load categories (-Excitation-,-Flag-,-Other-).
Boundary Conditions
In our model, we need to specify the magnetic vector potential to be zero, i.e., AZ=0. Under the Flux-Parallel, we choose On Lines, and we pick all the lines surrounding the model. The Flux-Parallel boundary conditions force the flux to flow parallel to a surface.
To do so, we use the following steps:
Main Menu>Preprocessor>Loads>-Loads-Apply>-Magnetic-Boundary>-Vector Poten-Flux Par’l-On Lines.
Excitation Loads
Source Current Density (JS): This specifies applied current to a source conductor. The units of JS are amperes / meter 2 in the metric system. For a 2-D analysis, only the Z component of JS is valid, a positive value indicates current flowing in the +Z direction in the planar case and the –Z (hoop) direction in the axisymmetric case.
Usually, we apply current density directly to the area. To do so, we use the following:
Main Menu>Preprocessor>Loads>-Loads-Apply>-Magnetic-Excitation>-Curr Density-On Areas.
Solving the Analysis
This section describes the tasks that we perform to solve a 2-D static magnetic analysis problem.
Defining the Analysis Type
Before we define the analysis type and the type of equation solver the analysis will use, we need to enter the SOLUTION processor. To do so, we use :
Main Menu>Solution
To specify the analysis type, we use:
Main Menu>Solution>New Analysis
Then we choose a static analysis. We can always restart an analysis only if we previously completed a 2-D static magnetic analysis.
Defining Analysis Options
ANSYS provides various equation solvers, including:
• Sparse solver
• Frontal solver
• Jacobi Conjugate Gradient (JCG) solver
• Incomplete Cholesky Conjugate Gradient (ICCG) solver
• Preconditioned Conjugate Gradient (PCG) solver
To select an equation solver, one can specify:
Main Menu>Solution>Analysis Options
For our Model, we use the Jocobi Conjugate Gradient (JCG) solver, because it is more useful for large 2-D models.
Saving a Backup Copy of the Database
Use the SAVE_DB button on the ANSYS Toolbar to save a backup copy of the ANSYS database. This enables us to retrieve the model incase the computer fail while analysis in progress. To retrieve a model, re-enter ANSYS and use the following:
Utility Menu>File>Resum Jobname.db
Starting the Solution
In this step, we specify magnetic solution options and initiate the solution. For a nonlinear analysis, we use two-step solution sequence:
1- Ramp the loads over tree to five substeps, each with one equilibrium iteration.
2- Calculate the final solution over one substep, with five 10-equilibrium iterations.
We can specify the two-step solution sequence and initiate the solution using:
Main Menu>Solution>Electromagnet>Opt & Solv
Tracking Convergence Graphically
As nonlinear electromagnetic analysis proceeds, ANSYS computes convergence norms with corresponding convergence criteria each equilibrium iteration. ANSYS considers a solution to be converged whenever specified convergence criteria are met. Convergence checking may be based on magnetic potential, magnetic field, or magnetic flux density.
In our case, we need to check the magnetic flux density, so if we specify 1.2 as the typical value for magnetic flux and 0.01 as the tolerance, the convergence criterion for magnetic flux would be 0.012. If ANSYS can not converge the solution within the specified number of equilibrium iterations, ANSYS either stops the solution or moves on to the next load step. When the two lines intersect, as shown in Figure 3.7, (Flux and CSG), that means we reach the convergence. The Graphical Solution Tracking (GST) feature displays the computed convergence norm and criteria while the solution is in progress.
Contents
Chapter 1. Introduction
1.1 Magneto Rheological fluids
1.2 Construction of an MR Damper
1.3 Performance of the MR Damper
1.4 Objectives
1.5 Approach
1.6 Outline
1.7 Contributions
Chapter 2. Background
2.1 MR Fluid
2.2 MR Devices
2.3 MR Dampers Basics
2.4 Mathematical Fundamentals of MR Dampers
Chapter 3. Finite Element Analysis- Based MR Model
3.1 Approach and Assumption
3.2 Element Description
3.3 Assumptions and Restrictions
3.4 Steps in a Static Magnetic Analysis
Chapter 4. Finite Element Model Results
4.1 Magnetic Flux Density
4.2 Force vs. Velocity Characteristics
4.3 Magnetic Field
4.4 Magnetic Flux Lines
Chapter 5. Design Analysis
5.1 Model 1: Curved Corner Farthest from the Coil
5.2 Model 2: Chamfered Corners Farthest from the Coil
5.3 Model 3: Two Curved Edges at the Corner of the MR Fluid Passage
5.4 Model 4: Increase the Outer Radius (b) by 50% of its Original Value
5.5 Conclusion
5.5.1 Damper Force Comparison
Chapter 6. Conclusion
1.0 Overview
2.0 Recommendations for Future Studies
References
GET THE COMPLETE PROJECT